
December 05, 2014 ( last updated : February 17, 2021 )
reverse engineering
wireshark
smart home
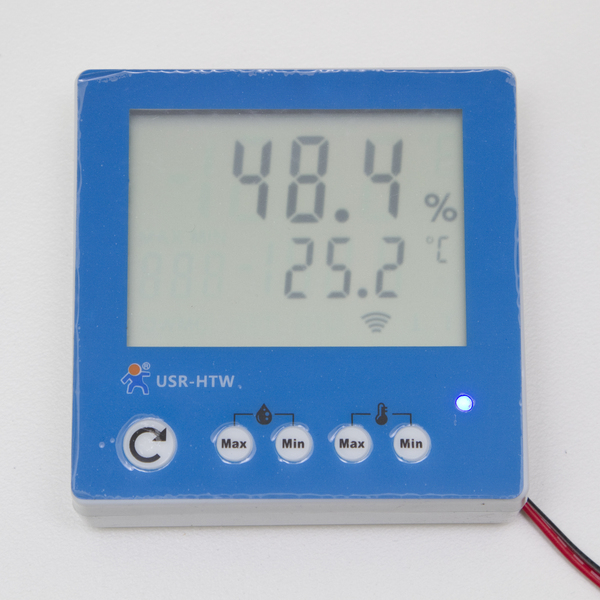
The USR-HTW Unit
TL;DR: The USR-HTW unit is a US$40 wifi enabled temperature & humidity sensor being produced in China. Out of the box it has an easy to use webpage to configure the wireless settings and runs a TCP server on port 8899. On connecting to this port, every 20-21 seconds it sends an 11 byte data string containing the current temperature and humidity sensor value in an easy to decode format.
I’ve decided to write this post with a considerable amount of detail, just so some users new to this can get a grasp of how I approached the problem. Whilst I admit I don’t see this as a challenge, as someone great once said “Nothing is hard when you know how to do it!”.
The Unit
This sensor is just one of the many wifi enabled devices starting to show up at very reasonable cost from the usual channels (AliExpress, eBay). It typically seems to be running at about US$40 per unit, and availability slowly seems to be improving. I ordered my unit a few weeks ago when I first spied them, thinking they looked like a good unit suitable for mounting on the wall for that distributed thermostat project that I have been meaning to get around to for awhile…
Anyway, the unit finally arrived today and I must say that I am actually pleasantly surprised at the build and assembly quality. This one even looks like the board was cleaned after the surface mount assembly process! The only thing to be somewhat careful of when opening the case was the RF cable running to the wireless antenna. The antenna uses a standard U.FL connector, so upgrading would be easy if required – just remove a dab of hot glue.
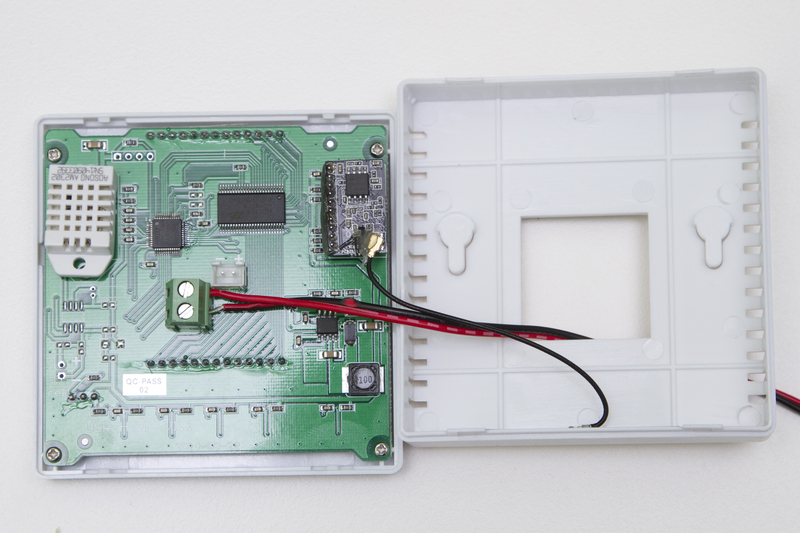
Inside the rear cover.
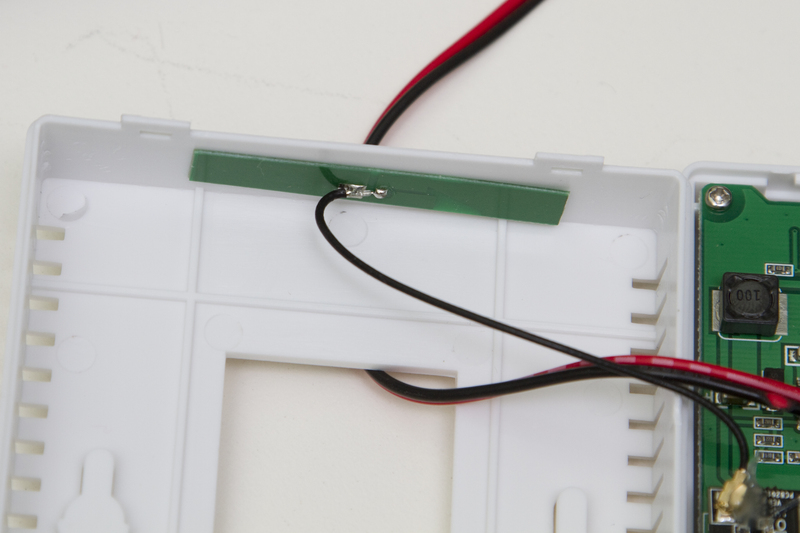
The Wifi Antenna
For those that are interested, the sensor is the AM2302 (DHT22) connected to an STM8S105 microcontroller, a Holtek HT1621B LCD Controller, and power is provided by an M2303ADN voltage regulator, allowing the board to accept an advertised 5-24V in. Wireless comms is handled by a USR-WIFI232-T module.
After the obligatory teardown, it was time to power the unit up for the first time, power connection is easy with screw terminals on the back. When the unit initially powers up, the wifi module acts as an access point, allowing easy web-based configuration of the module. Simply connect your favourite wireless-accessing device to the network broadcast as USR-HTW, open a browser and go to http://10.10.100.254, enter admin/admin and you are greeted with the configuration interface. If your native language is closer to English, there is a link provided with a translation. I must admit, I found that sometimes it was necessary to refresh the page a couple of times to get it to load, but after not too long I had the device on my resident wifi connection.
Factory Software
Smart IOT
My first point of call was to test the device with the manufacturer software “USR LonHand Setup Software”, found at http://www.usr.so/Download/117.html. This install was pretty seamless, after guessing my way through the Chinese installer. It extracted a single file into the Program Files folder, and after running this program it successfully found my sensor, and reported to me it’s current Temperature and Humidity value. It’s at this point that it is probably pertinent to mention that a brief press on the “Refresh” button on the front of the unit sends an update to the software as well. Like the web interface, there is an English version of this user interface should you click on EN in the bottom left hand corner. It’s also possible to change the name of both the Temperature and Humidity sensors by clicking on the text just to the left of their value.
Satisfied that the device worked to the specifications, it was really time for the fun to begin! Whilst there was a considerable amount of information available about the AT commands used in the module, there wasn’t any available about the actual protocol that transfers the temperature. My aim was to be able to use this for data logging with the minimal amount of effort possible, so I wanted to run with completely default parameters on the unit itself. If it’s good enough for them, it’ll do for me!
Protocol Discovery
I downloaded and fired up Wireshark, my packet sniffer of choice and setup a capture on my main network adapter. Of course, this results in a huge number of events so I set a filter of ip.src==10.2.2.250 or ip.dst==10.2.2.250 (where 10.2.2.250 was the IP address of the USR-HTW unit on my network, found from DHCP logs or the device URL easily accessed from clicking “Device URL from “Smart IOT” software.). This results in a lot less traffic. I set a capture to begin, then clicked the button to refresh the devices list. After my sensor appeared, I selected it and waited for the temperature to display. This yielded roughly the following events:
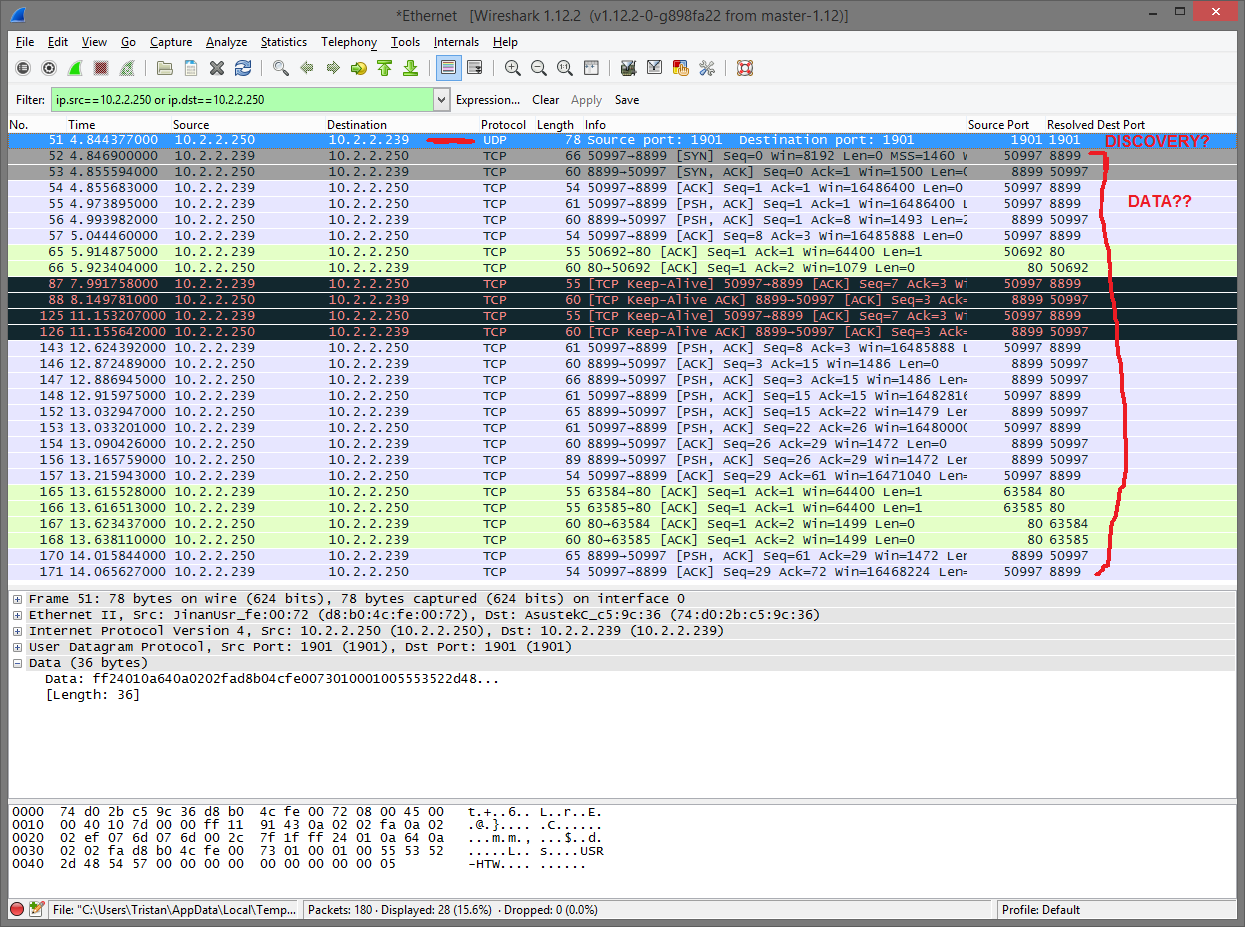
The single UDP packet is a response to a UDP multicast broadcast looking for devices sent on Port 1901. This is handy for the future, but not essential at the moment, and certainly won’t contain data. Looking through the rest of the TCP packets, the first thing to pickup is that comms seem to be occurring on ports 80 and 8899. Port 80 will be the webserver, though what function it plays in this I haven’t looked at. Port 8899 sounded much more interesting, so I had a poke through the packets. There was a few with data, though nothing easy to discern. The only ASCII characters of note were the name of the sensor that I had set earlier in the Smart IOT software. At this point I had the idea to setup another trace session in Wireshark, this time waiting until after the device was found in the software to begin capturing packets whilst I pressed the “Refresh” button on the unit repeatedly. This was much more fruitful, with a single pair of packets starting to become far more prevalent – exactly what I was hoping for.
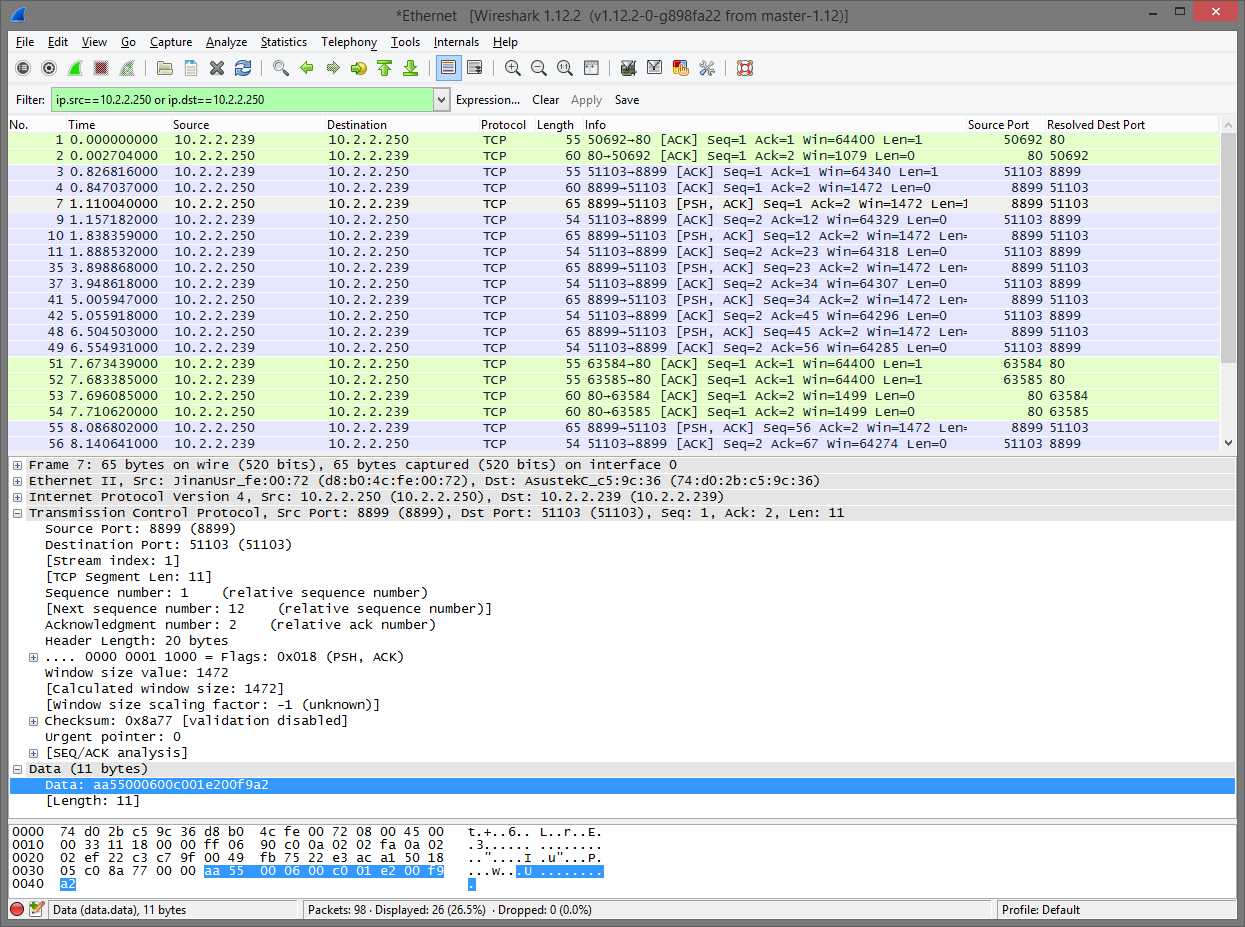
So based on this, it looks the unit will send the current data every time it is updated to any listener that is connected on port 8899. Bingo. Examining the packet data yielded a rather cryptic “aa:55:00:06:00:c0:01:e2:00:f9:a2” that varied with temperature and humidity, so it seemed pretty likely that this was the data I was looking for.

Data Decoding
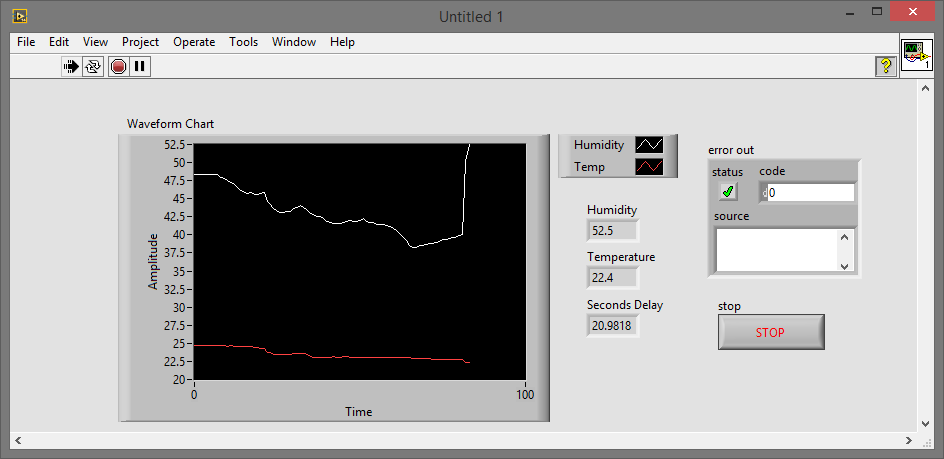
My first point of call was to setup a client in my programming language of choice, LabVIEW. It’s deliciously simple to setup, consisting of opening up a TCP listener, reading data from the client and closing the listener. See below for my test code. In this case it was a client listening to Port 8899 on 10.2.2.250, waiting for 11 bytes to be written. The real question that I needed to answer at this time was if all those TCP packets that I had ignored earlier were used to configure the device, or if they were just used to download device information to the Smart IOT software. With great delight, the first time I executed my LV code I was greeted with 11 bytes of text, no configuration required!
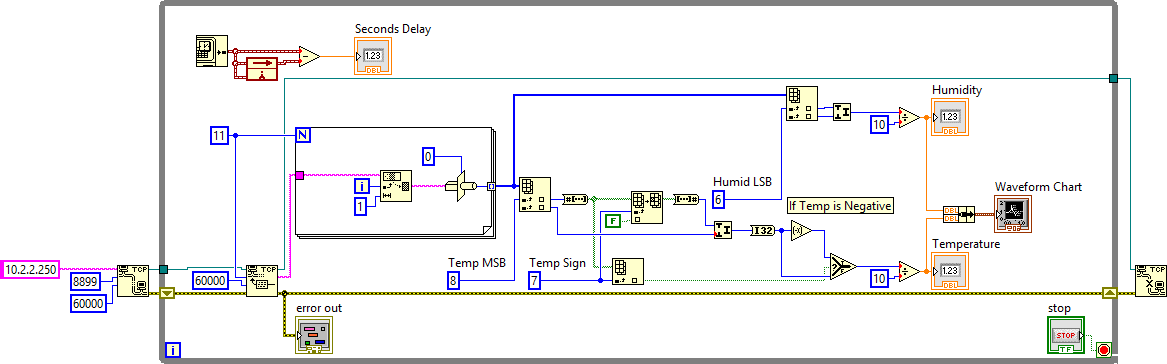
With a few more minutes of coding, I had decoded this 11 bytes represented as a string into an array of bytes, displayed in both Hexadecimal and Binary. Now it was time to crack the code!
With some basic experiments using a broad spectrum localised humidity generator (my breath) and a low entropy temperature source (a can of freezer spray) it quickly became obvious that only about 5 of these bytes contained any varying data. The rest seemed to remain constant all the time, so they were subsequently ignored. From this initial examination it looked like Bytes 7 & 8 seemed to be linked to the Humidity, Bytes 9 & 10 seemed to be linked to the Temperature and Byte 11 seemed to be linked to both (a checksum perhaps?).
Having never worked with a DHT22 sensor before, I was not familiar with their data protocol and representation, a quick Google yielded this helpful resource, with information on how the data was read out of the protocol. Four bytes of data, with a CRC check. I don’t believe in coincidences, so a few minutes later I had some code that would decode the 4 bytes of data provided by a DHT22 into Temperature & Humidity respectively. I plugged in the values from the datastream and it worked! The only value that didn’t match up was the CRC value, so a quick check of some basic checksum approaches calculated it out to be the sum of the first 10 bytes, plus 1. Byte 7 is the MSB, as is Byte 9.
I also finally measured the readout frequency, and on this particular unit it reports data about every 20-21 seconds, or every time you push the update button.
Finally, I did register an account using the Smart IOT software, but it didn’t gain me any useful configuration settings (such as refresh rate).
Note: this was all done with firmware version V1.0.04a. I don’t know if this is likely to change things in the future or not.
EDIT: I’ve just tested out some Python code, you can find it here: http://pastebin.com/G084ecaU
Originally published December 05, 2014 (Updated February 17, 2021)
Related posts :