March 31, 2022 ( last updated : March 31, 2022 )
ansible
homelab
pfsense
https://github.com/ozonejunkieau/ansible_backmeupplease
Like many people these days, I have a home network environment that extends beyond a single modem/router access point. VLAN’s, multiple access points, multiple WAN connections as well as PoE for some smart home devices means that I have a veritable mix of devices at any time sitting on the network. It ocurred to me recently, how long would it take me to replace one of these if it failed? When was the last time I did a configuration backup? …Shit.
What do I need to backup?
I started by listing out all the things in my homelab/network that had some configuration that could be lost, from the network switches at the heart of it all through to the OctoPi host that runs my 3d printer. The list was… non trivial. I then realised it wasn’t feasible with my easily-distracted mind to do this process manually, at least with any real frequency. Obviously, the solution is Ansible.
pfSense
It made sense to start with the thing that had probably the most configuration hours entwined within it: my gateway. I’ve been using pfSense as a firewall/gateway/dhcp server and more for coming up on 10 years now. I’ve been through hardware failures and upgrade pains, but that config file is gold to me. It’s so important, I actually had it backed up prior to embarking on this journey!
pfSense Backup Mechanism
The way that pfSense handles configuration backups is downloadable XML file that is accessible via the web interface. Some quick Google-fu showed that they even publish a guide on how to remotely pull this via curl/wget here. Easy I thought! I can just use the Ansible uri module to interact with this and it’ll be done in minutes.
This wasn’t the case. Though, admittedly it would be faster if I started following the curl instructions provided instead of the wget instructions. The challenging part in this interface is a somewhat… unique… double authentication that is required, where a cookie is provided as part of a HTTP 302 redirect that the default Ansible uri module doesn’t gracefully handle. Oh, and needing to use regex to extract out the CSFR token. Yuck.
In the end though, it works. The following single file play downloads the backup file and the contents of the file is available in pfsense_backup.content.
---
- hosts: localhost
  gather_facts: no

  vars:
    pfsense_host: pfsense.example.com
    pfsense_protocol: https
    pfsense_verify_certificate: yes
    pfsense_username: admin
    pfsense_password: thisisnotactuallymypassword

  tasks:
    - name: PFSENSE | Build base URL
      ansible.builtin.set_fact:
        pfsense_baseurl: "{{ pfsense_protocol }}://{{ pfsense_host }}"

    - name: PFSENSE | Get Cookies & CSRF Token 1
      ansible.builtin.uri:
        url: "{{ pfsense_baseurl }}/diag_backup.php"
        validate_certs: "{{ pfsense_verify_certificate }}"
        method: GET
        return_content: yes
      register: pfsense_token1

    - name: PFSENSE | Extract CSRF Token and Cookie
      ansible.builtin.set_fact:
        _pfsense_csrf1: "{{ pfsense_token1.content | regex_search('var\\s+csrfMagicToken\\s+=\\s+\\\"([a-f0-9sidp:;,]+)\\\"','\\1') }}"
        _pfsense_cookie1: "{{ pfsense_token1.set_cookie }}"

    - name: PFSENSE | Authenticate and fetch CSRF Token 2
      ansible.builtin.uri:
        url: "{{ pfsense_baseurl }}/diag_backup.php"
        validate_certs: "{{ pfsense_verify_certificate }}"
        follow_redirects: no
        method: POST
        return_content: yes
        body_format: form-urlencoded
        status_code: 302
        body:
          login: Login
          usernamefld: "{{ pfsense_username }}"
          passwordfld: "{{ pfsense_password }}"
          __csrf_magic: "{{ _pfsense_csrf1 }}"
        headers:
          Cookie: "{{ _pfsense_cookie1 }}"
      register: pfsense_token2

    - name: PFSENSE | Extract Cookie
      ansible.builtin.set_fact:
        _pfsense_cookie2: "{{ pfsense_token2.set_cookie }}"

    - name: PFSENSE | Fetch Target page for new CSRF token
      ansible.builtin.uri:
        url: "{{ pfsense_baseurl }}/diag_backup.php"
        validate_certs: "{{ pfsense_verify_certificate }}"
        follow_redirects: no
        method: GET
        return_content: yes
        headers:
          Cookie: "{{ _pfsense_cookie2 }}"
      register: pfsense_token3

    - name: PFSENSE | Extract CSRF Token
      ansible.builtin.set_fact:
        _pfsense_csrf2: "{{ pfsense_token3.content | regex_search('var\\s+csrfMagicToken\\s+=\\s+\\\"([a-f0-9sidp:;,]+)\\\"','\\1') }}"

    - name: PFSENSE | Fetch configuration backup file
      ansible.builtin.uri:
        url: "{{ pfsense_baseurl }}/diag_backup.php"
        validate_certs: "{{ pfsense_verify_certificate }}"
        method: POST
        return_content: yes
        body_format: form-urlencoded
        body:
          download: download
          donotbackuprrd: "yes"
          __csrf_magic: "{{ _pfsense_csrf2 }}"
        headers:
          Cookie: "{{ pfsense_token2.set_cookie }}"
      register: pfsense_backup

    - debug: var=pfsense_backup.content
With pfSense now under control, it was time to turn my attention to the switches that I frequently…
TP Link Easy Smart Switches
I have about 5 of these, as of the time of writing, and they have proven to be excellent value for money in terms of providing a switch that supports VLANs, has a management interface, is readily available, uses minimal power, and is cheap. I’ve got a mix of SG-1016PE, SG-108E, SG-105E devices, so this is only tested on them.
Diving into the Web Console
How do I login?
When wanting to interface to devices such as these from Ansible, I find the easiest place to begin is understanding how the web interface works. This can be almost trivially done from modern browsers (well, at least Chrome and Firefox). The feature that is most useful here is the connection monitoring.
My starting point is to go to the device homepage, start a session recording (Try Right Click -> Inspect in Chrome, navigate to Network), login to the device, wait a couple of seconds then stop recording the trace. This shows all the details of all the network requests that ocurred for this process to occur. On my SG1016PE device, a login is 68 requests.
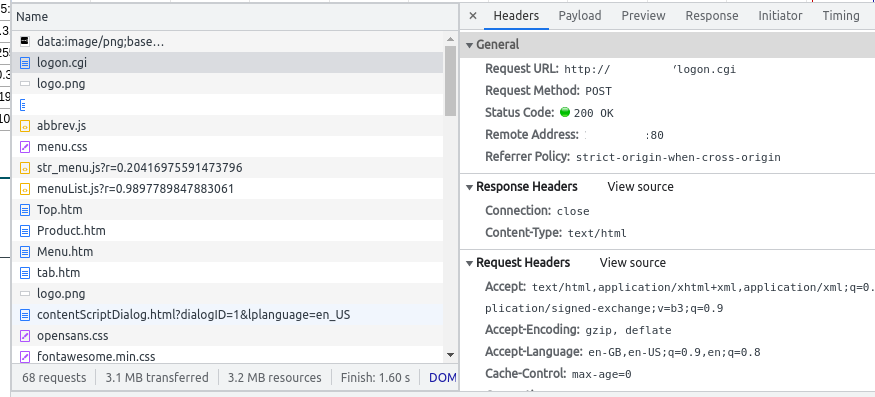
Looking down the Name column at what is being requested, a logon.cgi script is being called, which looks promising. Clicking on this, viewing the headers shows that a HTTP POST is being made to this resource, scrolling down a bit further into the Request Headers it can be seen that the Content-Type is application/x-www-form-urlencoded. This means that the POST request is being submitted with form encoding, a very standard way of submitting data to a website.
Navigating across to the Payload tab we can see that the following data is encoded in the form:
username: admin
password: (theadminpasswordgoeshere)
cpassword:
logon: Login
Great! This is how the browser is submitting the logon details to the device. Up next, how does the device know that I am an authorised user?
Normally authentication details have to be stored in the browser somehow, with Cookies arguably being the most common. Luckily Developer Tools help us here again - navigating to Application -> Storage in Chrome enables us to see if any cookies have been set or used in this request. A cursory examination here determines that no local device storage is in use for this request at all. I guess this means that the device is keeping track of who is logged in…?
I spent a bit of time playing around with this and it appears the switches just keep track of which IP address is currently authenticated to access the web console. It’s not secure (it is a cheap consumer device…) but it is trivial. It also means that the only thing we need to do from Ansible to login is issue the same POST request as above.
How do I download the configuration?
Using the same approach whilst downloading a system configuration backup instead of logging in yielded similar results. Issue a HTTP GET to a particular URL (http://device.example.com/config_back.cgi?btnBackup=Backup+Config) and the response body is the configuration, “neatly” formatted as a binary file.
How do I logout?
Even if the security is minimal at best, it is good practice to logout when you are finished with a device. Again, using that Developer tab, issuing a HTTP GET request to http://device.example.com/Logout.htm is sufficient to logout, even if it is in flagrant disregard to how the HTTP spec is designed.
Sticking it together with Ansible
After all that tinkering in the browser, we are left with three requests (1x POST, 2x GET) that are required to download the switch configuration. This is much simpler than the pfSense approach, and can be done with just three invocations:
---
- name: Backup tp-link Easy Smart Switch Device
  hosts: localhost
  vars:
    tplink_ess_username: admin
    tplink_ess_password: thisisnotactuallymypassword
    tplink_ess_host: device.example.com

  tasks:
    - name: TPLINK EASY SMART SWITCH | Login to authenticate
      ansible.builtin.uri:
        url: http://{{ tplink_ess_host }}/logon.cgi
        method: POST
        body_format: form-urlencoded
        body:
          username: "{{ tplink_ess_username }}"
          password: "{{ tplink_ess_password }}"
          cpassword: ""
          logon: Login

    - name: TPLINK EASY SMART SWITCH | Download configuration backup
      ansible.builtin.uri:
        url: http://{{ tplink_ess_host }}/config_back.cgi?btnBackup=Backup+Config
        return_content: yes
      register: _tplink_backup_response

    - name: TPLINK EASY SMART SWITCH | Logout
      ansible.builtin.uri:
        url: http://{{ tplink_ess_host }}/Logout.htm

    - debug: var=_tplink_backup_response.content
Microtik CSS610-8G-2S+IN (SwitchOS Lite)
Whilst I mostly use the TP Link devices as switches, I wanted a 10G link between my main hypervisor host and high speed storage. This was about the same time that this neat little switch hit the market, and despite the teething problems of early adoption it has proven to be a reliable little packet shunter.
Again, like the TP Link, there is no published specification for how to interact with these devices, but we can use the same approach documented before to explore how the browser and device interact.
It turns out this interaction is far more traditional, using a DIGEST mode authentication to access the resource when logging in (the popup in browser is a good hint that a “traditional” authentication process is being used). However, when recording the requests in the browser, I wasn’t able to see the file download being requested.
Given that the download is fired from what appears to be a JavaScript application, I decided to have a quick look through the source for this (which is in the requests list) to see if anything could be found. Even though the application itself has been obfuscated/minified, string values are maintained. A quick search for the term “Backup” yielded a string that was “/backup.swb” and given that was the file name that downloaded, I just tried to issue a direct GET to “http://device/backup.swb” - voila!
The combination of DIGEST auth and a direct GET to retrieve the file yield the simplest Ansible implementation yet:
---
- name: Backup Microtik SwOS Device
  hosts: localhost
  vars:
    microtik_username: admin
    microtik_password: thisisnotactuallymypassword
    microtik_host: device.example.com

  tasks:
    - name: MICROTIK | Download configuration backup
      ansible.builtin.uri:
        url: "http://{{ microtik_host }}/backup.swb"
        url_username: "{{ microtik_username }}"
        url_password: "{{ microtik_password }}"
        return_content: yes
      register: _microtik_backup_response


    - debug: var=_microtik_backup_response.content
Validation
As you may have noticed, the snippets above terminate at the point of getting the configuration in an Ansible variable that we can work with.
The next stage is to write this out to a local file, and verify that the result matches the output of downloading the configuration backup directly from the device web interface. If the file checksum of both are identical, we can be sure that the approach we are using is valid.
Where to from here?
Now it’s just a matter of structuring this into a single Ansible Playbook that I can call to backup all 7 devices. I’ve intentionally not used the typical Role structure, as I don’t really believe it adds anything to code like this. Instead, a single playbook with multiple task includes is used. Things like hostnames and credentials are encoded directly in this playbook, keeping it all self contained. At the minute, my playbook looks a little like this:
- name: Create local directory for storing backups
  hosts: localhost
  become: no
  connection: local
  run_once: yes
  vars:
    env_backup_path: /home/tristan/env_backup

  tasks:
    - name: Set fact for local path.
      ansible.builtin.set_fact:
        env_backup_path: "{{ env_backup_path }}"

    - name: Ensure that backup path exists on local machine.
      ansible.builtin.file:
        path: "{{ env_backup_path }}"
        state: directory


- name: Backup Microtik SwOS Device
  hosts: localhost
  connection: local
  vars:
    microtik_username: admin
    microtik_password: notmyadminpassword
    microtik_host: device
    microtik_backupname: MICROTIK
  tasks:
    - include_tasks: "tasks_backup_microtik.yml"

- hosts: localhost
  gather_facts: no
  connection: local
  vars:
    pfsense_host: pfsense.example.com
    pfsense_protocol: https
    pfsense_verify_certificate: yes
    pfsense_username: admin
    pfsense_password: notmyadminpassword
  tasks:
    - include_tasks: "tasks_backup_pfsense.yml"

- hosts: localhost
  gather_facts: no
  connection: local
  vars:
    tplink_ess_hosts:
      - device1
      - device2
    tplink_ess_username: admin
    tplink_ess_password: notmyadminpassword
  tasks:
    - include_tasks: "tasks_backup_smartswitch.yml"
      loop: "{{ tplink_ess_hosts }}"
      loop_control:
        loop_var: tplink_ess_host
This is just the start of my journey into automating backups in my environment. I will slowly be adding to the GitHub Project Page as I manage to bring more parts into this.

Originally published March 31, 2022 (Updated March 31, 2022)
Related posts :